
antrylis
They/them - AroaceLego MOCs and photography with a wide range of different characters and environments, every Wednesday (in theory-)
77 posts
Latest Posts by antrylis
So, uhm. I wanted to post something a bit different here today. Behold a short thing I did a while ago (I'm actually posting it because I found it while cleaning some files). I'll admit, the quality of both the image and whatever I was trying to tell is pretty low. But I think overall, it's still surprisingly decent, for what it's supposed to be.
I did a lot of these some time ago, but it's terribly time-consuming, so I've had to stop. Hopefully, next break, I'll have the occasion to do these again (now with better image quality, and even proper MOCs to use). I miss doing stop-motion a lot-
I sadly don't have much of that project left (images, bits of the background...), though strangely enough, I still have some of the characters. Though I know why the lighting is so bad : at that point, I only had a set of blue lights, which caused this blue filter all over it (it looked really nice, though. Without any camera...)
I won't point out all of the weird details, but I am still quite proud of that odd use of a hair piece as a broom. Some pieces certainly have some unexpected uses.

✨Tree ! ✨
So I found another technic. And it makes for great (albeit round) trees.
Anyway, some rambling about that below.
Another angle. It's not needed; but oh well.

It's very simple, I'll admit that. Then again, I don't do purely organic MOCs very often, the last one was probably my Camp Site, and it wasn't the main focus at the time, but I'm trying.
Anyway, if you actually decided to read that, you're probably seeking whatever technic I used to make that, not the random rambling. So here it is :

To sum it up : core piece is a modified 1x1 brick, surrounded on all sides by two flower stems (I've used the bar ones, the stud variants work too). Then flowers and leaves. To give some varied shapes, you can get some leaves upside down (cyan ones on the image), and you can also get rid of flowers by using a piece on the other side of the leaf (any piece works as long as it has a small bar connection), like the blue one on the right. Of course, same trick as before to give some shapes. It has some limitations, but I still think it's relatively good. If you like sphere, that it, hence why using a couple of them is better.
Also, I feel like, since I'm yapping about organic MOCs, I have to present my very first one :

That's ugly. But at least, you can technically tell it's a flower.
It's fragile and it's not interesting, though one funny thing is that, in order to keep it from collapsing under its own weight, I've had to add small iron bars (think unfolded paper clips) in the stem, which is actually really sturdy, while allowing for curvy shapes. Probably the only thing worth keeping from that thing.
Anyway, this whole tree thing was an accidental tangent from an actual, cool(?) MOC I was working on, which might actually be posted next week. Or maybe not, who knows really ?

![✨Looks To The Moon✨ [1/2]](https://64.media.tumblr.com/8673892d6391d798d2e17a3d5ce540c4/b43f6ed2c41a5d1f-3b/s500x750/bc7b11f6b9448e7e96451100f0081125861f2c1f.jpg)
✨Looks To The Moon✨ [1/2]
Where do I even start with that ? Oh, yeah. It’s not done just yet (if that wasn’t obvious enough).
Though, I won’t have the opportunity to work on it for a while, so I figured I might as well share the progress.
Obviously, I’m missing the water; and an outside — as well as a few other things I’ll mention somewhere below (along with closeups and way too many details, as always).
If you don’t care about any of that, you could still check up my silly little FP there !
Lots, lots of things to talk about here…
(Structure first, feel free to skip to the first actual close up if you consider that as boring.)
First of all, here is an edited version of the first pic, with water :
![✨Looks To The Moon✨ [1/2]](https://64.media.tumblr.com/ea39d63ea2dcbb3bc92aa755b0d4d40c/b43f6ed2c41a5d1f-71/s500x750/61199b745c19b0917b1b6e8368b0c7546abaa1a8.jpg)
Looks much better already. And although it might prove complicated, I have a plan. Sort of. Because Lego has this really cool, transparent blue piece which they produced a lot of : folding garage doors. They’re everywhere on firefighter sets, and they’re really wide. With a few tricks, they might work.
As for the outside, well…I’m not there just yet. I’ll try to cover it up with some Iterator-esque pattern, I suppose.
I’m also missing a scug ! I absolutely want one, and given how I chose to represent the scene, it won’t be Saint nor Spears (shame). Rivulet is really tempting, but it might make too much blue; currently, my choice might be on Monk, to have sufficient contrast (and Monk is cute). Though I might change that, depending on how much small yellow pieces I have.
Now, before talking about the inside, let’s take a peek at the outside :
![✨Looks To The Moon✨ [1/2]](https://64.media.tumblr.com/871f4a5f0d56b953e8de148ff40a2c3c/b43f6ed2c41a5d1f-0a/s500x750/11b869101b74a3016e20b69dbf5ba74211c1b821.jpg)
Here it is (back side, specifically). It’s a bit of mess because of the technics im using — which I’ll come to in just a seconds — but I also find it oddly fitting with the Iterators theme. The blacks on each sides are holding the cube together, and the technic bars in the middle are ensuring everything is held together — and also compensating for the weight of the top plate, kind of like how I did with my Carrion MOC a while back.
Anyway, the Technic™️.
The one thing which I find striking in Iterators cans is the tiling (14x14 from my last count), and it’s not that easy to replicate through Lego. Either you have no gap at all, and you use only the tiles’ grove as a separation (which, here, is way too small) or you make them very far apart, which looks terrible here). However, my tiling technic here is (not entirely mine) usually something you’d see to make floors, especially castels.
Here, I have three layers : the dark grey layer, which is the base; the light gray, which is the tiles; and, in between, I have a layer of black dots forming a grid diagonally to the first layer, on which the tiles are placed. This diagonality explains why, on the pic above, my plates have so much spiky edges, and which I have to use this whole complicated system to hold everything together.
Of course, it gets worse ! Because the cans are not perfect cubes, the edges are bevelled. And so I bevelled. Now, with all these intricacies, there was no way any regular connection would keep these edges in place. You can also spot what I used instead, which is an awful lot of ball and socket joints (mixel style). Incredibly useful, those pieces.
Anyway, enough boring structural details, here come the fun part !
Small things first, here is a comparison of the first vs final design for the neuron flies :
![✨Looks To The Moon✨ [1/2]](https://64.media.tumblr.com/6fc18f71aa5a566f239a04658bdaa2b1/b43f6ed2c41a5d1f-d7/s500x750/8c00b65ae9ed9e3815a0dfa05afac4aef312f2c9.jpg)
![✨Looks To The Moon✨ [1/2]](https://64.media.tumblr.com/7aa3ed3889c2725fda3cb5707181c360/b43f6ed2c41a5d1f-00/s500x750/cf712d96ae5c58a6774642670aa9cc465c46911d.jpg)
I’m really glad I actually managed to do that — they’re an important element, and the conception had me worried for a little bit.
The first design is, in my opinion, the best one can make at this scale. Slight issue : it’s not actually physically possible to make it hold together. After a lot of different iterations (ah !) I’m came up with the design on the right. It’s a bit more square, but it has a distinct head and floppy tails, which was all I was asking for. Obviously, the two tooth pieces I’m using are hardly held at all (using a mod 1x1 joint piece). There’s also, behind, a white dot with a hole, which ensures that these can be connected to the background via the long, transparent bars. Wasn’t easy to stick them without breaking them, and there’s no way I’m touching these now.
![✨Looks To The Moon✨ [1/2]](https://64.media.tumblr.com/7217074bc04fbf14f9c736e361ec67e5/b43f6ed2c41a5d1f-98/s500x750/02db63d8269d5e91989886e7d82ce393ba743cb6.jpg)
Her. She is the central piece of my MOC after all. It took me a while to figure out the design (mostly the head), but I’m glad of how it turned out. It’s not perfect, of course, but I feel like it works well, both scale-wise and color wise. And there’s only one (two) illegal connections, for the antennas which I’m making using hands. It’s very tempting to draw her a face — I’ll probably consider it, at some point.
The arm behind is also relatively good, with loose cables hanging from it. Once again, ball and socket joints are here to save the day; although I do feel like some parts of it are a little bulky, and it doesn’t drop down low enough…
Additional details, the piles of debris.
![✨Looks To The Moon✨ [1/2]](https://64.media.tumblr.com/669c04363442a3247a589729a9662ce0/b43f6ed2c41a5d1f-b8/s500x750/6a07583141d576aa968ae6e966c49c008336bf10.jpg)
It’s…really difficult to make debris which don’t look purpose, and aren’t simply horrendous to look at. I tried to keep some grey tones, but also incorporated some brown, because it does actually bring some well needed contrast to the whole scene; and a few plants.
Speaking of plants, I’m no really liking these vines hanging from the ceiling (much thinner and darker in game), but as far as my expertise go, I dont see another way to get them here — and if there’s nothing at all, the whole piece suddenly gets really dull. Of course, there’s also the gap in the ceiling, with cables falling out; this, I will add more details to later on — and I have the hope to get a proper light source to go through it and act as a sun which will fall directly on my small LttM.
To conclude, here are final views of it, from further away, and with a brick separator from scale. It does look quite flimsy, doesn’t it ?
![✨Looks To The Moon✨ [1/2]](https://64.media.tumblr.com/d51f8a684b768c0a7223411e69dff690/b43f6ed2c41a5d1f-c8/s500x750/88d4ed5aa97df2a0f985dfbdd56187b5f046232e.jpg)
![✨Looks To The Moon✨ [1/2]](https://64.media.tumblr.com/f11171cfd8f3d6d55b2f41f46b2d7314/b43f6ed2c41a5d1f-5b/s500x750/69aeba2df224bab421ecb45cd578b90c68e1620c.jpg)
Oh, and, well. I’ve been messing with Dots recently. Figured this was worth including as a footer (probably on of the first achievements I unlocked — poor Moon~).
![✨Looks To The Moon✨ [1/2]](https://64.media.tumblr.com/2ed459bb6232038d802ac64afd31fe15/b43f6ed2c41a5d1f-77/s500x750/a88a5b9e2dfba1a119dd2d0ae623e595a0c06b84.jpg)

✨Smol Five Pebbles !✨
In a box, to be studied like a bug.
It’s a bit sketchy, but I really like the idea of small boxes diorama, so that you can just pile them up (this one is roughly the same size as this other thingy I made .
(You can also check up my Moon design, while you’re here !)
I tried to cram as much stuff as possible in there (an overseer, pearls, the entrance tubes…), which is quite the challenge in a 6x6x6 cube. I also added a small rail for the arm to 'slide' on. The technic itself is not exactly difficult, although, once more, brick-textured bricks are here to save the day. As it is the only 'illegal' connection of the whole build (who could believe it, coming from me, uh ?), I’ve also been refining it in StudIO to possibly make other Iterators~


Everything is held together through these four black brackets on the back, which makes working on it ridiculously simple : I can simply clip off a panel to modify it. (Also featuring my hand, for scale and because I still can’t take photos properly, it seems.)
Speaking of, since you made it all the way down here…I’m also working on another Rain World MOC, just a tiiiiny bit bigger. So here’s a sneak peek~
[edit] : here it is !

Hey I don't know if you saw my repost on your post but I would appreciate and would definitely built a brickheadz version of the boba fett prototype minifig that I have as my profile picture. Your post says feel free to request any more and I thought it was worth a shot even though I doubt he'd appeal to more people than me.


✨Boba Fett Prototype ! ✨
Hi ! This has been in my inbox for ages, I know. Finally had time to give it a try ! Had a lot of fun, actually, mandos have some really interesting shapes.
And, because it took me so long, I figured, I'd also give instructions, too. Some colours might not be available, though, but white should be pretty easy to find for the outside pieces.
Instructions can be found here !
Nice LEGO work! Glad to see MOCs are still shared by folks.
Thank you very much !
And as a proper answer, here is a little silly thing I made recently !
Still working on making it reliable, but’s a fun little project on the side of other things I have going on !

✨Snowman !✨
Couldn’t miss this year’s Christmas-themed MOC, of course ! Although it certainly is way less 'christmasy' than the previous ones (here and here) and more of a general winter decoration, it fits well.
There’s not a lot of technical work here, the spheres are classic designs which I tweaked a little, the arms are quite simple, the scarf has nothing complicated either; the only interesting bit might be the hat, because I used a really old technic piece — can’t find its id on bricklink… — with some other gears and such.
Anyway, merry Christmas to those who celebrate, and good day to everyone else !
Also, sorry for the terrible pic quality, I don’t have any proper set up; and I know I have a few things sitting in my inbox, I’ll get to it I swear.


✨Custom clones !✨
I really like messing around with minifigs, and I had recently got my hand on a 501st battle pack, which meant I had some spare accessories !
Of course, custom weapons, else it would be no fun, and of course of of them use illegal technic, because it's kind of my signature at that point. I really like how they all turned out - including the Dimension plates which are a really nice display base.
The most interesting piece it the small cloak piece I used on the sword one (Nexo Knight sword obviously !), because, first of all, it's blue, and it comes from some Marvel sets, which isn't a theme I manipulate often - which is a shame, there are some really cool pieces in there.
Also, these need names, but I did not find any yet...


✨The Kraken !✨
I’ve been messing around with water technics recently, and this was born. It certainly could be improved, but I like it like that.
There’s not much to mention about the build itself; except maybe the tentacles, which are only made out of the 1x1 round bricks, and nothing inside : they bend quite well and remain relatively sturdy when doing so.
As for the water technic I mentioned, the goal is to cover everything with tiles of one of two colours; and make a gradient underneath (see below). I also added some dark red into the mix to try and replicate the body of the thing underwater, with mitigated results.


✨Pride clones !✨
As I mentioned somewhere in my previous post (I think ?) I found my clones missing colours. So I did a rainbow Cody, and things went downhill from here.
There's not much to say about it built-wise that I haven't already said, but a few mentions of my colour palette might be interesting, notably some shade of 'rubber' materials, for a few of the purples. Also, there aren't nearly enough blue-green shades to satisfy my needs, but I can't do much about it.
You may also ask for other flags, who knows how they'll look...
Speaking of, the flags here have nothing to do with any headcannons or whatnot, they're purely aesthetic - or practical, since some colour subdivisions are easier to represent on some models than on others.

✨More Clones Brickheadz !✨
Since I acquired the Small Cody (40675), I found that there was an untapped mine. Why would they only make one ? Well. I don't have an answer to that, but I decided to take matters into my own one; so behold : 11 more. I went mostly for commanders here, but then I went a bit astray and so I added some captains to the mix.
In order, row by row :
Tukk (Not cannon but the colours are so beautiful)/Vaungh (died too soon-)/Rex (obviously)/Fordo (I did Rex, so I had to)
Gree/Doom/Thorn/Neyo
Bly/Cody/Fox/Wolffe
It was a really fun project, and I hope to do more of them in the future - maybe even phase 1s, some day~); supposedly not commanders because I did most of them (except Bacara, I know...The helmet was too tough).
And because I really like challenges, if you want to see another clone turned into one of these (Be it cannon or one of your ocs) feel free to send requests in my aksbox !)
Anyway this post is already far too long for anyone's dashboard, so closeups and details will be under the cut !
Let's start with the easy ones : Cody, Doom, Fox, Thorn


Obviously, Cody was easy, I just rebuilt the original one virtually - Nothing too hard. The printed pieces here are not the right ones, because Cody's are not available on STUDio yet, but the storm trooper ones were relatively similar, so I used these for most of these models. Of course, it means I'm lacking the sun bands, and a few other distinctive elements, but it works well enough for now.
Now, Doom is essentially a colour variation (minus a few antennas). I also used an old space piece, which has this big yellow arrow printed on it. I's not exactly what Doom has, but I feel like it's close enough for a first attempt.
Then, Fox is relatively similar to Doom, but with two DC-17s. I also moved the printed torso brick up to get that red line he has.
Thorn works in a similar way to Cody too, except I removed both accessories on the side of the helmet. I also added this tile with diagonal lines to figure the wings he has. One day I'll slap some real wings on there, but I haven't found the right image yet. I also gave him a Z-6, obviously. I really like it, so I might actually make that one physically, because the way it's build (with old binocular pieces) is pretty nice; although I doubt the pieces are available in black.
Moving on to two captains : Vaughn and Tukk !


Admittedly, not really that different either, except for one thing : I learnt to do custom prints now ! Yay ! Well, these are really basic : the blue line for Vaughn, and some trapezoids for Tukk's helmet (which are, indeed, not visible here - shame, I spent so long making these fit). The Ahsoka pattern was already in STUDio (because Ahsoka already has her own brickheadz, which I'll get my hands on someday~)
I must also add that having some cyan in this whole thing added some much needed colours in here, I'm grateful some people give their clones amazing colours (If somehow someone doesn't know who Tukk is, well just check High Ground Animation. Right now. It's really cool, trust me). Anyway.
As for design changes, I modified the faces slightly by adding 1x1 tiles, to allow for different colours variations on the face. It makes them look slightly blockier, but given the overall size of the head, it doesn't do much.
I also gave Vaughn a DC-15A. It's a bit messy, but it works out well enough. Past me forgot to render it, so here is a raw, in-software picture of it (from Fordo(s hand, but it's the same design for both) :

BARC helmets ? Wolffe, Fordo, Neyo


As I've been told, these look a bit wonky, and I'll admit its wasn't exactly easy, but in my defence, it's relatively hard to get such round shapes with bricks (lego cheated by adding the visor). Anyway, given that doing that with a printed piece was out of the question, I tried to replicate the filter's shape with actual bricks, and I used a printed piece which, technically, is Lando's moustache, but downward. I'd say it does the job relatively well.
I also added a rangefinder to Wolffe, which is a little big compared to everyone else's antennas, but It's still relatively to scale with the head itself. No custom prints for him (not sure where I would find the correct pattern images ?), but I've done it for Fordo and Neyo. Fordo obviously has his well deserved Jaig eyes (and who knew it would be that difficult to find a picture of that on internet ?), and Neyo has his symbol on the helmet, chest plate, and the shoulder not shown here.
The really tinkered ones : Gree, Bly, Rex :


Here, it was a matter of trials and errors to figure out just how to get the shapes right.
I actually started with Bly, by removing the previous visor and adding the macrobinoculars first, then I tried to shape the helmet around. Truth is, it doesn't make sense technically : the two separated parts of the helmet do not connected at all, if you remove the equipment. Luckily, no one has to know that.
Next is Gree. It took me some time to figure out how to properly get a round feel, but I feel like it's as good as I can make it like this. Colour-wise, it was surprisingly difficult to find how to balance the different shades of green, and equally hard was to figure out which silvery colour would render well in STUDio. The answer lied, as it always does, in Bionicle. Of course, none of these pieces exist in this colour, but it's not really my main problem (because none of the coloured printed pieces exist either).
Finally, Rex...He gave me some trouble, I have to admit. Firstly, the part-designing software decided to have some trouble with custom prints, which was problematic, because I simply couldn't do Rex without jaig eyes (and Fordo already had his). Then, I started with Gree's base and tried to go from there to fit Rex's custom helmet. I ended up using Boba Fett's printed visor piece for Rex, because these were all triangles. I also got rid of the printed chest piece and used some black plates to simulate the pouch he has; while also adding a a few more custom printed pieces for the arms and pauldron (barely visible, but they're here. I'm not entirely happy with it, but I don't see much other solutions than more and more custom prints, which isn't my goal, so it'll stay like that for now.
Anyway, that's way too much rambling for one post, so I'll just end by saying that next week I'll post an alt version of this whole build [here !], with some 'slight' colour alterations. Definitely nothing big.

✨Books !✨
A small gift made for a relative ! I’m not entirely happy with the result, because it feels a bit empty, but anything I tried to add did not help (such as plants, to get a result similar to this old MOC I made a while ago).
Anyway, other angles, because I like these small MOCs to be visible from all angles :


Also, if anyone like the design of these books, you might want to check what lies below~

Feel free to use this !
I made this because I did some tests virtually before actually building it, and although I slightly modified the design to stack them up, it’s pretty much the same~

✨Micro-Nether !✨
And a small wither to go with it~
There’s not much to say about this build, it’s mostly just a tiny box with triangles and cubes inside. I’m considering making more of these in the future (feel free to suggest biomes/mobs in my inbox !) while keeping the scale (8*8*8), which is a bit of a challenge, but it’s fun.


✨Bile titan✨
Or the fact that I don’t have access to real legos anymore will not stop me from making mocs (more on that under the cut).
I’ve really enjoyed Helldivers and I’ve been meaning to make one of those for some time, now. And I think it turned out quite alright, all things considered. It’s a shame this happened he will never physically be on my shelf, but it’s better than nothing~
Anyway, details and rumbling under the cut, as always.
Here are more viewpoints :


Most of the parts here are articulated, although the head barely moved, and the second joint of each leg is fixed, because making it movable with this size would have been a hassle.
Though, it still has a lot of posability (even the small pincers move !).
The bottom is not really detailed, because it won’t be seen much, but I’ve still added a few things, including the protuberant bile sack underneath, because it gave me a great excuse to use an alien egg, which used to be an incredible piece.
Now though, let’s deal with what this isn’t : real.
It’s fully made with Bricklink’s Studio, which is a free computer software giving one access to pretty much all the bricks you can think of, without limitations on colour (this is great, because 99% of the pieces I use here do not exist in the colour scheme I used). It also comes with a part designer, to create custom prints and/or bricks. There aren’t any prints here, but I am working on something else which uses them.
The only down part is that I can’t use any illegal technic, which is a shame since I usually rely on those a lot (check my post about the Citadel and you’ll understand~). It does make sense, though, and custom rotations are allowed, so it’s not all bad.
Also, if you’ve read until there, congrats ! I do have one more thing to say, though. Given that I know have access to an infinite amount of bricks, I can take requests, if you ever have an idea you’d want to see realised (albeit note it might take a while !).

✨Clone wars Scuba trooper !✨
A like to make custom clones only using official pieces, here is a scuba (because lego did not give us a Monnk...)
It's not really complicated, although trying to get a DC-12U was far from easy. It's still a bit bulky but I like how it turned out (and one day, I'll try to have multiple of these to get a small underwater diorama, that would be lovely).


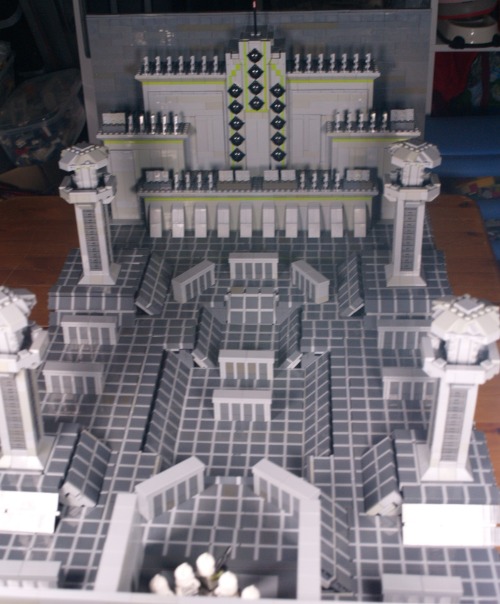
✨Kamino’s citadel challenge !✨
I am…very excited about this one. I’ve had this vision for a long time, and I’m so happy it’s ended up looking like that.
Now, there are a lot of things I’ll go into details along close ups under the cut; the only thing I’ll mention above is that I’m very grateful for TCW’s episode guides’ artworks, without which this would have been quite a hassle.

Okay ! Before diving into all the details and things, here is a view from above, to really display how big it is. Dimension-wise, the plank I built it on is around 110*70cm.

Now of course, the first detail which is noticeable is the floor, because, well, it’s everywhere.

This was probably the most challenging part of the build, because making a grid out of Lego is tough. Most of it is rows and rows of dark square, light lines, separated by 1*n tiles. It was the easiest way to get this pattern with as if it were just tiles; because this is one of the objectives I had here : most of this MOC is smooth, except for a few zones (usually voluntarily).
The fact I used this technic means that the floor in most place isn’t very stable, but it actually holds up pretty well because of some hidden connection points with the foundations underneath, which are mostly hidden under the cover blocks.

Here for instance, I’m using modified 1*2 bricks with a Technic hole : it hold the cover block, and it also attaches the floor to the foundation.
Of course, another problem I ran into were slopes. Much harder to get a smooth effect with the technic I’ve used, so it’s a bit wonky and unstable. Also, most them are not aligned properly, which is visible in the picture above (and some area have some really big misalignments because of a few problems I probably won’t bore anyone reading this with).
Now, since they’re also here, I can deal with the cover blocks. These were, among the details, the hardest to figure out, to get a good size while keeping some texture. Eventually I came up with this design, which, ironically enough, uses the same technic the floor uses, in a different orientation.
Another detail : the miradors :

This is one of the first elements I had in place, because I needed them to get a good sense of scale (and was made better by an existing concept art of a tower alone). Most of it does not have anything noteworthy, except for one illegal technic I used (can you spot it ?)
The pillar holding the roof of the mirador is using a technic I had in my toolbox for a long time, but had never had the occasion to use : if you take two 'brick' bricks and attach them perpendicularly on a snot brick, the small space separating the lines of 'bricks' align to let a 1*n tile in. It’s somewhat reliable (for an illegal technic) and an easy way to get octogonal shapes.
Now, before looking at the Citadel itself, let’s turn around for a minute.

This point of view obviously isn’t the intended one, but it’s still worth noting, if only for some composition.
Notice that the wall here is quite small (smaller than the miradors, even), and light gray; it’s in contrast with the towering dark gray wall on the other side, behind the citadel, which technically should give at least some impressions even to the people who never saw TCW.
Anyway, it’s also on this view that we can see most of my slope struggles, including the central one, which is the biggest I had to do.
And I can’t not mention the most important element :

What would be the challenge without a squad of clones to take it on ? These clones (4 privates and a sergent) are ready to fight ! Well. Kinda. I wish I could have actual cadets, but they are not part of the Lego universe (and the floor was enough of a fee, I can’t afford to get customs figures too). I wish I had the Dominos though. I have TBB Echo, and I plan to get my hands on Fives at some point, but they wouldn’t fit here, sadly, so instead I used some movie accurate clones (because all the others are used for a project I still haven’t posted..maybe later…)
Notably, I at some point tried to get the elevator to work - needless to say it was a disaster (it’s too close to the plate underneath to make something working).
Now, without further ado. The citadel.

I’m very proud of it. I got the proportions just right (I actually made some measurements to make sure of it), and there is just enough texture to not make it bland while leaving it as artificial. This alone took roughly 8-10h (which were all spent during an accidental all nighter, whoops), but it was worth it. It’s completely empty inside, and, in fact, the wall behind it isn’t full as well, anything behind the citadel is opened. The spikes are simple 1*3 angle plates illegally connected, and the walls’ small details were made with a bunch of modified 1*2 plates, there isn’t anything really special in it.
The only really complicated zone was the middle tower, because I had to put all the cannons while keeping it clean and smooth, and including the vertical lime lines. It was a fun challenge. And I included the 'flag' At the top, too, just a red transparent cone on a stick (there’s no need for more), which peeks above the gray wall (for composition and because of a lack of pieces).
Anyway, such a long project deserves one behind the scene photo :

Yes, my desk is messy (and include my mandatory tea cup).
On the left, you can see my remaining floor tiles, which have not been used yet; and just under the citadel, you might notice the foundations visible; it’s a checker of 2*2 tiles which gives my floor a good base to be fixed on. There are also some slopes which haven’t been placed yet (in front of the background miradors), and at this steps, there were no cover blocks or walls yet.
As far as my tools go, you might notice brick separators scattered all around my work environment (I never have enough of those), as well as a tablet in the bottom right hand corner (which i use to check and measure concept arts), and in the middle, the red triangle is an official (albeit old) Lego measurement tool which counts in stud, Lego bar holes and axe length.
Also visible, finally, is the bottom of the foundations, which are stacks of 1*2 bricks (each of the three floor layer is separated by a height of 3 bricks), which means that looking directly under it can lead to watching the dark basement of my build (which isn’t aesthetic…).
Anyway, if you read until here, thanks, I guess ? I still have a few TCW related stuff (a small one next week, some other in the foreseeable feature), so feel free to stick around and maybe leave a note, if you feel like it ? That’s it, bye !

✨Another custom vehicle !✨
It has eyes !
This horrendous prototype is a follow up to this post.
Now here is a video of how it works (using the same remote from the other post, that thing is universal !). I wish I had a way to display the good all-terrain capacities of this vehicle (other than wood and seashells...
Details beneath !
Side view :

There are plenty of things here to discuss. Firstly, the suspensions ! Three spring pistons : one of the 'new' models, two much older ones (System, can you believe it ?). At rest, the two small white discs in the middle don't touch the tread, but as soon as an object pass underneath, they get involved. The advantage of this system is that, with every part mobile, the obstacles can be passed easily. And I added rubber grips too.
These treads are powered by PF XL motors. Very very heavy and big, they have the same speed as other motors but much more torque. We're talking of Mindstrom-level torque; this means that In theory, I can add as much weight as I want and keep it at a more than decent page.
You can also see that I fixed two of the biggest flaws from my previous model : firstly the RC receivers have been turned to get signals from multiple angles. Secondly, to rotate the tower, I used a worm gearbox with a PF M to really slow it down; and the wires have been fixed to have a broader angular range.
The turret ? The turret !

These eyes are the best addition to this MOC.
You might notice that I have a servo and a PF M on the turret. This is because the weapon here is a harpoon with a cable. And it has a winch ! All of that with only four controls : two for treads, one for rotation, and one to fire/retract cable.
How ? Well I'm glad you asked. The firing works just like in the previous vehicle : the servo's arm presses on the spring-powered projectile and it flies, along with the cable connected to the other motor.
As for the retraction, it's slightly more complex : on the remote, I press the firing lever the other way around : this causes the servo's arm to go on the winch and it fits nicely, so that when the PF M rotates, the thread can't escape the winch (a video will be in the reblogs, because Tumblr doesn't want me to upload two videos at once...)
Major problems here are the following :
the PF M often detaches itself from the turret
the harpoon often get stuck on the treads
the thread is too short (yeah...)

✨Custom technic vehicle !✨
Something which I had never really posted on before was that, although I enjoy bricks (or Bionicle parts) a lot, I also like to mess around with Technic, when I have the occasion to.
Most of this one is a bunch of additions made on top of the 42065 set, because it's an overall really fun set, with enough space inside to cram in some additional mechanisms.
Here is a video of that thing performing :
...And the remote !

Of course, details and close ups under the cut !
So, here is the (non exhaustive) list of what I added/changed :
Colours of the middle line and addition of some decorative tubes;
A fancy blade at the front;
Plenty of lights;
A turret.
I'll discuss all of these below (except for the first point, which is quite straight forward.
The front :

So, the main plate I used for the vehicle's blade is often used in large Technic cars, mostly for roofs; but used the other way around, it has a nice shape. It's not very functional, but it's aesthetic, and inside are two of the lights I have integrated (some of the cables are visible on the right).
The side :

From here, we can see my beautiful mess of cables (I forced the top open to show it, because it's not as opened at rest). Most of the large cables here are getting power from the battery to the RC receivers; while the small cables are all lights (I might have used too many-).
You might also notice the there are some bumps on the tread pieces : these are rubber grip pieces which I stole from a Nexo Knight Fortrex (it's doing fine without them). These make the plastic less slippery when on rock, but it does a poor job on grass (because grass blades get caught in the gaps of the treads pieces) - to fix that, I would use some of the old rubber treads, but they're way to small to be used as suchs. Instead, to remedy to the problem, I changed the original motors from the default PF M to PF L, which have more power and torque (and can thus reach their max speed even with the added mass). While the two motors have the same theoretical speed, this modified model drives faster than it's standard counter part (it's funny to take over other cars, don't judge).
Back view :

Here you can see the PF M I was talking about (bottom right, the second one is at the front of the vehicle). You may also notice that I have a second mess of cables , because my two receivers are here.
Two major problems with that :
The placement of the receivers makes it so that I can't control the vehicle, unless behind it (oops 1);
Because one of the receivers (on top) had bad wiring with one of the tread motors, the turret is heavily limited in its movements (oops 2).
Turret :

So ! That's the most interesting part of it (obviously).
Now, please note that it was my first time trying to do it, and plenty of my design choices were bad, but fixed in my V2 (will probably be posted next week~).
The way it works is actually quite simple : I have a motor underneath (PF M) positioned horizontally, which is connected directly to the light gray gear (just under the trans green piece on the left) which itself connects to the black base gear on which is mounted the turret. Because of the direct motor connection, the turrets is a nightmare to aim. Not good.
As for the cannon, it's just a servo and a spring cannon. When the servo is activated, the grey technic piece presses the projectile and it flies. Surprisingly simple. (It also lights up the green lights on the side, for fun).
Anyway, this is a fun project to play with. Next week, I might post the V2, which is...Quite different. You'll see :}
And bonus cat picture !


✨Small theatre !✨
A small but really fun build made for a relative’s birthday.
While there isn’t much to mention build-wise, a few details are interesting :


Firstly, I managed to get the effect of multiple curtains in a row by making 'banners' which are directly connected to the ground.
The base is partially empty, and behind the gold details are 1*4 black tiles on snots which give a pretty nice black aspect (although now that I think back on it, 1*4 bricks would have done the job.
Finally, the floor is a single, large door from a castle set ! I really like the way it’s shaped and likely will reuse that technic again someday.
✨I made a carrd✨
A friend of mine said I could use it — they were right !
Essentially, I now have all of my published MOCs sorted by theme in a single place (as well as a few unpublished ones !)
Here it is : https://enteroctoups-darkysils.carrd.co/ !

It also feature some none-Lego photographs, too, feel free to take a look.
Small, unnecessary update bellow the cut :
I’m gonna have to remove the 'one post every Wednesday', for multiple reasons : firstly, I’m gonna start a long maths cursus which won’t leave me much time to build — or even to post; and, beside that, I’m running out of MOCs ! I still have a few, which I will probably work on and queue so that they appear semi-regularly. I received just earlier today part of the pieces I’ll need for my final(?) MOC. And it’s a big one. Well anyway, I’ll be off to work on it now ! Thanks for reading this far~


✨Brick separators !✨
Run, they have teeth now !
This is a silly project I did ages ago; given that I've officially been posting for a year straight each week (ignoring my disappearing space station post, ahem), I thought it would be nice to post that little guy whose view welcomes me every morning.
And, sure, it's not my finest work, by far, albeit I could go on a rant about the many fun technics I used (look at the horn !). But that's alright !Why ? Because the main goal of legos is not to build extravagant looking buildings, or ships, and landscapes. I don't even need to give a profound answer to what it's meant to be; everything is in the title :
"The name 'LEGO' is an abbreviation of the two Danish words “leg godt”, meaning “play well”. It's our name and it's our ideal." - Lego.com 'About Us' page
In the end, it's just a toy, and what you build with it is not important, as long as you had fun making it ! The pieces I enjoy the most are the one that come to me as a vision that I develop, and I appreciate them much better than some of my (arguably better) commissions I get (because, yes, that somehow happens), because commissions are not spontaneous.
The morale of the story, I guess, is that you don't have to hesitate if you want to build something, no matter how silly it is, no matter it's your first or hundredth moc; and you should be proud of it, no matter how it turns out, if you had fun with it.

✨Assault on the droid factory (P1) !✨
A decently-sized MOC I've been working on for the past few weeks. These is the landing platform of the factory, and, hopefully, I will take some time to make the actual factory inside, which is nothing more than an idea, at the moment.
Closeups and details under the cut !
The door :

I have a lot of fun with the mountainside of this MOC : It's been a while since I last did rocky terrain (or any terrain at all), and it is an enjoyable process. Most of the bottom is supported by large rock pieces (for structural integrity), but anything around and above the door is meticulously hand crafted from slopes. I also added some little plants here and there to break the dull grey, including some weird spiralling plants, because alien environment.
The door itself is just a bunch of slopes, and then two black sections. It's not moving and will remain in this half-opened state indefinitely.
The bridge :

Really the heart of the MOC, both visually and structurally. While it's covered everywhere, there are technic bars running under the large plates, and that's what allows everything to stay together. Just below the landing platform, you might spot one small antenna acting as a pillar. It's only there to keep the bridge in this position, as most of the charge is held by the mountain. It was a bit dull at first, so I added the cable running under it, and the small barriers, which fit the aesthetic without being overwhelming.
As for the action, here is a brief summary of what story I'm trying to tell : a squad of ARC are infiltrating a droid to destroy it, using a stolen CIS ship. Upon their arrival, they face heavy resistance.
Trying to breath life in these scenes is really fun, and it uses multiple tricks, from the droid falling off the bridge to the one being pushed by the shield, plus the clone jumping on a droid to stab it. Speaking of, here they are !
The clones :
MOC postures :


Rest postures :


Custom clones ! I absolutely love making these, and I still have a lot of similarly customised ones on my shelves. The ARCs from the battle pack look awesome, and even if they all have the same prints and color, it doesn't take much to change their appearance.
Sadly, I couldn't find enough kamas for all of the, so only the first and third ones have one. Same goes for the pauldron, so only the three first have one (plus the fifth, but it's a different kind which, I think, comes from a mando). For visors and rangefinders, the choice was mostly arbitrary, because I have a lot of each, so I tried to guess who of the clones would need them, according to their roles (because they have roles. And names, too ! From left to right : Orders, Surge, Bacta, Gears, and Stalker.) I also used the kneeling posture, which is, essentially, in half my TCW MOCs (just check out this one if you're doubting me. Or if you want to see a really cool thing, too.)
A lot of weapons are at least partially custom too :the left clone's weapon (hands can be attached at the bottom of the weapons as a grip); the Z-6 for the next one (would be better if Lego had black versions of the grey pieces, but alas, they don't exist as of yet), the shield (held together by an actual 2*3 shield piece, and the printed GAR cog is just the perfect piece to go with it), the rocket launcher (as screen accurate as I could do, which is to say not much). I also used a fancy silver knife as a vibroknife, because why not, after all ?
Another worthy addition :

While Lego's default ARC backpacks are pretty cool, I find this technic really nice to add a proper communication antenna : one lever attached to the side of a minifig roller skate piece. The connection is not very secure, but since it's only used for display, it's alright.
The ship :


As some might have seen already, this is a variation of the 8036 separatist shuttle. It is a bit longer than the original, and have more details on top. I changed the original antenna for a fencing sword piece, which looks better, and adjusted the dorsal wing a wing, as well as the side, to add the CIS-stickered pieces.
Mostly, this version has so much more playability than the original : it was only made to accommodate a droid pilot and one passenger. This version can fit : one pilot and one astromech in the front, plus a whole bunch of minifigs in the back; and the two parts are connected. Ironically, it won't ever be seen, but it still is a nice thing to know.
You're still here ? Well, I guess you enjoyed this MOC then. If it is the case, stay tuned, because I still have one big TCW diorama which I need to figure how to showcase, and another one in the making, which will also be terribly hard to showcase, but that will be a problem for later me !

✨Aroaceage pride flag !✨
Another one to my collection ! (see the previous one here). I don’t even understand how I had never even heard of it before, but now that I know it exists, it is now comfortably sitting with all the others.
Like this and don’t see your flag among the ones I made ? I’m open to requests in my ask box !
Additional note : I made a matching bracelet ! (Shades of blue slightly different because of the colours I had available).


✨Tragon !✨
Trans...dragon..It's funny, right ?- Also, I know it's a wyvern...Dragon sounds better...
It's pride month, so it was the perfect occasion to finally make a dragon, yay ! It's also my first time making something akin to a dragon (technically the second time,, but the first one is truly horrible), and even if the proportion are still a bit out of place, it could have been worse. It's also my first time doing custom wings, but I'll talk about that in more details beneath :}
Also, it needs a name ! I’m really bad with names, but I would gladly take suggestions ! (And here is an alt picture, in its natural habitat-)

Anyways, details/closeups under the cut !
None of these picture below are edited, because it's exam period- Enjoy the green backgrounds :}

I have to say, before any other comment, that I made the body way to heavy for the two poor sockets of the legs. The position above is the only one where it's actually standing upright. Also, my stock of pink and rightly-shaded blue was much smaller than originally anticipated, so I would have done a bunch of tings differently, if it wasn't for that. Still, I was lucky to have that many curved blue pieces for the top part. Well, all of the ones with purple diamonds on them have been forcefully taken from a small Elves dragon, but it was worth it (I also really enjoy the purple here, it contrasts nicely).
All of the joints are mixel socket joints, except for the knees, which are just hinges. It gives a lot of movements, from the tail to the jaw. Even if these are limited, it gives it a wide range of positions (even if, realistically, it won’t change it much from the one I gave it). Still, it can sit ! (Including small trans flag)

The pointy scales on the back are some of the only elements which aren’t directly attacked to the body : one 2*2 plate holds them down, and a modified 2*1 under the plates keeps it from sliding in any other direction, so even with little connections, it doesn’t budge. I really liked these angular pieces. To keep them from being too repetitive, they are only connected to each other by one stud, with a small angle, which gives them a slightly "round" effect.

The tail here is not really complicated, it's just a bunch of socket joints linked together with curved tiles on top (one of the sticker is backward, and it's unnerving, but it's not my fault and I can't risk changing it...), with white arch pieces underneath. Not sure of why I added these in the first place, but it looks cool. And of course, the end of the tail is a big heart, because it simply fits the vibe, doesn't it?
Of course, I can't forget what is the most important, and what makes this creature as cute as it is ! (It is cute, and if that is the hill I have to die on, I will.)


The green background doesn't show it well, but the flame offers a good contrats with the rest of the head, and brings the eyes there first (instead of all the mistakes present). Because there are a bunch of these.
I spent nearly as long on the head as all the other body parts cumulated (except for the wings), because making something detailed yet small enough to be a good head is tough. I actually started from the top (for the piece with the sticker, more exactly), instead of the bottom, like I usually do, in order to get an idea of scale (because I already knew I wanted the jaw to move, and for that I needed to see how big it would be). Then, I did the back to quickly have a neck connection point, to see if it would fit. Because the neck is larger under the connection sockets, the socket of the head is actually pretty high up, but the colours are practically aligned so it works well.
Then, the next thing was the eyes and the spikes. The spikes took me a hile to figure out, because without the rest of the head, they looked kinda dumb, but it does bring the head together when everything is in place. Then the eyes : on the small dragon I took apart, there were these blue tooth pieces which I used to get some texture above them, so that they don't look flat, and then, I connected them to the center connectors of a 2*4 plates. That works well in placement, but I ran into the issue of what would be around. If I didn't do anything, there would be two gaps, which would look terrible. Instead, I stuck two 1*4 tiles in these gaps, and since the tooth pieces are around either side, they don't move - well, not much, they still produce a shaking sound when I'm moving the head.
Then under these plates, I directly have 1*4 pink bricks, which stick out behind the head. At first, it was a problem, and I had nothing else to replace them; but they actually restrict and hold the neck, so that even if the head is technically a bit too heavy, it remains in place.
The actual teeth are modified 2*1 plates, four at the top and four at the bottom. To keep them with such a small gap (and to attach them to either sides of the jaw) I have use modified 1*1 plates with a ring. There is a single one at the bottom, and then underneath a few cut 2*1 and 2*2 curved tiles to make the jaw triangular; and two on top, one which connects it to the head and one with holds the snout (which is using a cheese piece and another one of the blue tooth).
So, custom wings ! It isn't actually complicated, if only a bit tedious. Here below is all that I needed to make them :

As you can see, it's not much. Most important, of course, is a good, solid sheet of paper, and a cutter (precision cutter is better, in my opinion, but anything works). To make things easy (or if, like me, you don't know how to draw properly), you can take a basic lego wing, and trace the outline and where the holes go. I would advise only doing a single, blank one, at first. Once you have your proto-wing, you can start to make the actual frame it will be attached on. I chose to use bricks above it to act as claws, but you can use socket joints, like in most sets. The advantage of using plates is that the overall look is better, but if you want overhangs like I did, you have to get the holes really close to the edge of the wing.
Once you have your frame, trace where the holes would go on it ! (if you used a wing model, it might be easier, but it could also not fit, which is why you make a prototype first). To make holes just the right size, I would advise first cutting squares (easier than circles) at just the right size, then scratching the edges with the blade of the cutter. Once it looks good, try to fit an axle inside. If it just about fits, and can rotate, it's good ! Otherwise, just remove it and scratch again.
When that's done, test if it can correctly fit on your frame. Once that's done, you can either make two wings with that pattern, or simply make another copy. I personally made two new from my first prototype because it took me a while to figure out exactly how to place the holes.
Finally, once you got two wings, you can finally add whatever you want on them (easier when they're not actually on the frame, although that should've been obvious), and you're done :}

I went for a really basic thing, but technically, any shape is possible. I'll likely use it again someday, because it's quite fun !
And of course, the bonus picture, since you’re here ! I like the symbolic of this (also don’t pay attention to the tentacles).

I actually really wanted to get rid of this castle (which was gifted, not exactly desired, although I must admit it’s really well designed), and well. Now, it’s gone, and in its place lies the dragon…and my horrendous crab, too.
I rarely, if ever, reblog things, but that’s just beautiful; Lego at its finest.
BESTIES BESTIES BESTIES

FOUND THIS SUCKER IN A LEGO STORE IN NYC
and the employees had pronoun pins as well!

✨Bionicle crab !✨
It was, originally, meant to be just another arthropod. However, someone reblogged my previous rahi, along with this comment :

Well, guess what ? Yes, absolutely. I’m glad I saw it because it gave me the inspiration for this monstrosity (and it made me laugh more than I would admit, too). Thanks.
I must recognise that if I compare my rahis, there is a clear pipeline. I don’t think it can go much further in this direction.
Anyways, details/closeups/weird illegal technic I just found out, below the cut !
Front (smol Visorak for scale) :

Because it’s really big. It’s also a good excuse to show off my really fancy and glittery Kanohi. No clue where it comes from but it’s beautiful !
I’m really happy with how mean this things looks, overall. It’s most definitely the bad guy for Toas to fight. It has a really good scale to work with my larger customer Toas [here], but it could also act as a really large rahi for my smaller space-based Toas [here]. Why a large crab stealing Kanohis in space, you may ask ? No idea. I’d have to actually think out a lore for that.
I started the conception with the frame (which does make sense, in theory), then the legs, and finally the shell. This was only partially smart, because that meant I did not account for the shell's mass when building the legs. Essentially, this poor thing can't stand on it's own, so I'm using two technic bars underneath to keep it up right (which are hidden in editing, of course).
Top/Hind (shell) :


I think the shell was pretty decent. I tried to use as little pieces as possible to keep it light, but it's still a lot. Among these pieces can be found one Visorak claw and three Mantax feet, which have a nice texture for organic feet. There is also another foot at the front which comes from an Inika set which I can't seem to find. I'm also using some of these large technic panels, which cover a lot of surface without being too much of a pain to set up (still quite a lot, since they're connected to the feet at at an angle, feet which which are also connected to the frame at an odd angle...) Speaking of Mantax, I alsu used the black-pearl shells, because these, too, have a really organic vibe, and it gave a small touch of pearl which was missing on the body.
I tried to keep the back relatively slick, to avoid something similar to an abdomen since it's not a spider. Still I had to extend it a little bit using the rounded cubical cover, to hide some socket joints, but it's okay-ish.
Neath :

Truly a mess, I must admit. As I started with each side separately, I tried to somehow connect them with the large grey technic frame (in the middle). On either sides, I have a whole bunch of axle connectors, both standard and angled, which allow for the thing to appear rounder than it could have been. The two leg sockets peices at the front are used for the eyes, and the pieces abov (barley visible) is a classic Bionicle shoulders piece clipped backward as a base for the pincers arms.
Pincer :

Or mandatory unusual feet usage. These really works well as any kind of claw or armor, in my opinion. The black arm pieces used here (Hordika leg piece) were particularly good for the job as they technic pin holes in there allowed me to add ad additional socket practically at the same level at the original one (even if I would rather have used black technic bars instead of the light grey ones, but i couldn't find any in my supplies... It's likely the Space station's fault.
Legs :

Or equally mandatory foot out of not foot pieces. Here is a cursed homebrew way to make legs : one Bohrok head part (bricklink call these shoulders ?) to display the piston-like element and serve as structure, linked with Toa Metru legs (which slots above nicely. And then comes the magic trick, for the Rahkshi shells (silveragain, because I have many of these) have a small attachment point toward the end, that is meant to hold the back blades in place; but it also perfectly fits right on the small ledge in the middle of the leg piece ! Granted, it's not a very secure connection, but these two pieces don't need anything else but that to hold. I actually loved this one so much, you can notice two additional Rahkshi shells held similarly on the tope of the crab's shell.
In order to connect the legs individually to the frame, I am using Vahki legs for the exterior limbs, and Pihraka arms for the central ones (these arms have the particular property of having the restrictive sockets on either sides, which makes it good to keep the leg's shape.
The middle sections are made using two simple axle-socket pieces connected by old plates, usually found in technic sets predating the Bionicle them.
…And obviously, I had to make another makeshift studio (I actually really like this one). Have a look at all these terribly assembled elements !


✨Bionicle…Rahi ?✨
Yeah, I’m not sure what that one exactly is…But I like it.
I don’t currently have any other Rahi in stock (well, I do have one but it’s terribly ugly), however I do have one in the making, which might be ready for next week. Else, I have a few other things I might get at (including a fancy idea since it’s pride month, which I’m hoping to manage to pull off…). Of course, if you have ideas, I’d gladly hear them !
Aaanyway, rant aside, building details under the cut !

For once, legs are utterly simple, since they’re all made of a single blade piece. Nevertheless, I had to use feet somewhere, so you might notice that the entire spine is made of feet piled on top of each other. They are only connected near the tail by a single socket.
Speaking of the tail, it’s made of a weapon piece of Nuju Metru, but the connector was all twisted so I couldn’t use it as a proper weapon. Well, it gives some movement to the beast, so it’s a great thing still.
Similarly, the tongue/flame (I’m still unsure of which it is meant to be) is a partially broken Tahu sword. It’s not actually held securely, because it’s inserted in the technic pin connector of the dark red shoulder blade I’m using as the face of the beast. On each side of this piece are silver Bohrok eyes as teeth, which themselves are partially covered with limb armor pieces.
The main body is not actually very complex, because I found a quite large red technic piece which looks somewhat like a throne and acts as a great base (if anyone has any idea where this piece comes from, based on this very unclear description, I’d like to know where it comes from); and four small blades placed horizontally to make the body slightly rounder.
You will notice this Rahi can actually more or less fit in my shelf studio, which is quite remarkable, because it means I don’t have to set up a temporary studio all over again. Might have to do it for the next build, though.
Also, I actually started my spreadsheet for bionicle gens ! (It incredibly tedious..)

✨Bionicle Beetle !✨
Ah, another insect ! Check the other one here.
Does it ring a bell ? The head (and some of the brown parts) come directly and with very few modifications from the Jaller & Gukko set. I never managed to get Jaller, so instead, I turned Gukko into this nice, big Rahi.
Now, of course, detail and the other pictures below the cut !
Front, hind, and neath !


I’m absolutely delighted with how it turned out. First of all, I really like the head which has been intact for as long as I can remember, although I know that I’ll never complete the set because I don’t have Jaller’s Kanohi. What I have plenty of, however, are the pearl grey Rahkshi shells, so you can see that I’ve used three of them on top. Then, I have to find pieces with a good enough curvature. So the next piece is from a Toa torso (Hordika) and the next one is used as a wing/pauldron on different sets, which has a perfect shape. On the sides, I’m using practically only pieces from a brown Vahki.
The underside is quite simple, but I wanted to make sure the colours remained coherent with the head, so I kept this bright brown while trying to make it as light as possible (the six legs are already barely letting it stand).
Under the dual Rahkshi shells, I have a bit of space which could let me add a nice feature, although I don’t know what yet. I planned on making actual elytra, but that would have been too complex, so there is currently nothing.
There isn’t much left to add, since for once, I have made simple legs (only because the body was more complicated…), but I nevertheless want to point out how well the small arm pieces I used to connect body and feet are for insect-like shapes, while keeping it quite mechanical. Just the perfect balance.
Also. Would anyone happen to know if there is a spreadsheet referencing all Bionicle (bonkle ‽-) gens with images and additional infos ? I have done a tremendous amount of research because I can’t remember any of the names properly, and having a single spreadsheet would be easier. AND, if not, would anyone be interested in access in such a spreadsheet ? Because if I do end up making one, I would be happy to share !
Have a nice day :}

✨Bionicle insect !✨
Yay, back to Bionicles MOCs !
I made fewer of these, but here is the first one (other images and additional details below the cut).
I’m still not entirely convinced of the edited photos, but given the size of these MOCs, I didn’t really have much choice but to do how I did. At least the ones with background give a few colours.
Anyway, photos of the left and underside !


This was really a fun one to work with, obviously largely inspired by the Visorak sets (I kept the head piece and the claws), but with more legs !
The claws are combined with feet to add some shape (the two pieces work quite well together) to the end of the legs, then I made of 4 joints articulations to give it a proper insect-like stance. The middle legs are slightly longer (using a long transparent blue piece, instead of the small dark one), which makes it less linear.
I kept the disc of the Visorak, held in place by…a broken Pirahka headpiece. Yes, I’m not exactly very original in my techniques, and I have a lot of these broken pieces. As you might see in the third picture, I have the secondary connectors of that piece attached to the belly of the beast, so to speak.
Although, speaking of techniques, the one I’m using for the 'tail' is not exactly recommendable. It’s a bit tough to see, but there is an elastic band attached to the foot used as a tail part on the third picture. It’s the only element which connects the end of the tail (shiny Visorak claw in second picture) to the rest of the body, which makes it wobbly but offers some interesting movements if needed.
Oh yeah, I also used Vakama’s disc launcher again, as mandibles this time. I originally tried to make a transparent blue disc (from all promotional sets) inside, but it doesn’t fit well enough).
I’m considering making another in another colour, but I’ll have to see if I even have enough ressources to do so~ Maybe green and silver, since these are pieces I have a bunch of, or black and silver…Only time will tell.