✨Custom Clones !✨


✨Custom clones !✨
I really like messing around with minifigs, and I had recently got my hand on a 501st battle pack, which meant I had some spare accessories !
Of course, custom weapons, else it would be no fun, and of course of of them use illegal technic, because it's kind of my signature at that point. I really like how they all turned out - including the Dimension plates which are a really nice display base.
The most interesting piece it the small cloak piece I used on the sword one (Nexo Knight sword obviously !), because, first of all, it's blue, and it comes from some Marvel sets, which isn't a theme I manipulate often - which is a shame, there are some really cool pieces in there.
Also, these need names, but I did not find any yet...
More Posts from Antrylis and Others

✨Trade space station !✨
<Previous< [2/4] >Next>
Today’s gonna be about the progress of the build in time, which allows me to ramble about the building process. Yay !

Before actually commenting the build. You may notice chocolate and my (empty) tea mug. They should be apparent in most of the earliest pictures (there was not enough space on the table for them at the end of the project, sadly~
So, here, you can see that my first step was to see the scale of my project. The template of the large ring to see how much space it would take, and the small ring to see how round I could make it (and at the bottom, you can see the white curved pieces. Enjoy this view, it won’t last.)
You can also notice above that I already stared making some small ships.

The next day ! You can see on the left my long rod. This was the ideal height for the central cylinder. I also created the first core of the build (replaced later because too fragile), and the first arms to hold the ring (too fragile too).

Progress ! This is the moment I realised my original color scheme would not work (you can see orange and bright green on the side, which I tried before the sand green).
I had half of the big cylinder added (you can see the slots left for the additional details) and another naked half on the right side. And my collection of boxes on the table is growing. It’s only getting worse after that.

See ? More boxes (and pieces) scattered all around. And a hammer, too. I at this point mostly finished the big cylinder (or so I thought, some reinforcements were necessary), started the smaller cylinder, and realised white pieces were running out. I also still haven’t touch the ring yet, as I wanted to stay focused on one bit.

Mostly done with the cylinders at the point (you can even see the start of the smallest one on the right side). Agin the boxes grow ominously.
Since it was time to start the ring, I created a replica of a sixth of it. Given that there were twelve sections, I wanted to be sure of the design before starting to build them all, starting with the facade. It took some fiddling around (you can see these aren’t symmetrical, as I was trying out different designs). Really, if you have this kind of things to do, try to make it in a vacuum first, you’ll gain a lot of time later, once the prototype has every problem answered (mine were mostly the curve, and the link between each plates (solved with mod 1*2 black plates).

See ? After the prototype was done, I simply built all of the facades and attached them (you can see my 1*4 curved pieces were all missing at the time though).
I kept the prototype on the side, because I’ll still need it later. I also am missing half of the ring (the part above, since there is only a structure below), because I was not sure of how everything would fit, and I waited until these parts were assembled before making it, in case adjustments were needed.

Here is the top part ! And all the hangars done, too. It took me a surprising amount of time to do all twelve of them…

Huge progress ! There is no more room on the table for the boxes, but you can see them…on the floor, on the left…Lot was done, from the bottom cylinder now finished along with its ring, the covering pieces of the big ring (except the internal faces), the hat of the station, and a huge reinforcement for the six arms, which was done separately). At this point, except for a few details, the station itself is finished.

And there is a picture taken moments before disaster. The station is done (ignoring the transitions between cylinders) the arm…supposedly, too.
Sadly, the arm wasn’t, in fact, finished. If you read the first post, you will notice it isn’t as bulky, and isn’t attached on baseplates yet.
Well, guess what ? When I finally tried to see if the arm would hold onto the station, it broke. Rather, two pieces broke, then the rest came down, and so did the station, which shattered on the floor below. Luckily for me, the main cylinder was so dense it practically completely survived. Most of the hangars of the rings only broke section per section, so it only took a few hours to get it back together, but much more time to make the arm solid. And now, it can hold the station for ten hours without flinching ! So, here is a lesson. If something you do fails when you do it with your heart, let the rage flow through you and build it back out of spite. It works* !
*don’t hold me accountable for any failure using that method

✨Geonosis !✨
Ah, Geonosis. What a terrible place. But it’s aesthetically pleasing, so I did it anyway. And it was a good excuse to use the movie-accurate minfigs (a commander, a sergeant, and three shinies. I have a lot of other commanders, but I’ll figure what to do with them later).
Since I didn’t have much of these orange bricks, so most of them are sideways, with some modified bricks to keep the clones in place. Also, the bottom of the first spike is an old bionicle part I thought I’d never use, but it did a good job here.


✨Brick separators !✨
Run, they have teeth now !
This is a silly project I did ages ago; given that I've officially been posting for a year straight each week (ignoring my disappearing space station post, ahem), I thought it would be nice to post that little guy whose view welcomes me every morning.
And, sure, it's not my finest work, by far, albeit I could go on a rant about the many fun technics I used (look at the horn !). But that's alright !Why ? Because the main goal of legos is not to build extravagant looking buildings, or ships, and landscapes. I don't even need to give a profound answer to what it's meant to be; everything is in the title :
"The name 'LEGO' is an abbreviation of the two Danish words “leg godt”, meaning “play well”. It's our name and it's our ideal." - Lego.com 'About Us' page
In the end, it's just a toy, and what you build with it is not important, as long as you had fun making it ! The pieces I enjoy the most are the one that come to me as a vision that I develop, and I appreciate them much better than some of my (arguably better) commissions I get (because, yes, that somehow happens), because commissions are not spontaneous.
The morale of the story, I guess, is that you don't have to hesitate if you want to build something, no matter how silly it is, no matter it's your first or hundredth moc; and you should be proud of it, no matter how it turns out, if you had fun with it.


✨The Kraken !✨
I’ve been messing around with water technics recently, and this was born. It certainly could be improved, but I like it like that.
There’s not much to mention about the build itself; except maybe the tentacles, which are only made out of the 1x1 round bricks, and nothing inside : they bend quite well and remain relatively sturdy when doing so.
As for the water technic I mentioned, the goal is to cover everything with tiles of one of two colours; and make a gradient underneath (see below). I also added some dark red into the mix to try and replicate the body of the thing underwater, with mitigated results.

✨Trade Space Station !✨
[1/4] >Next>
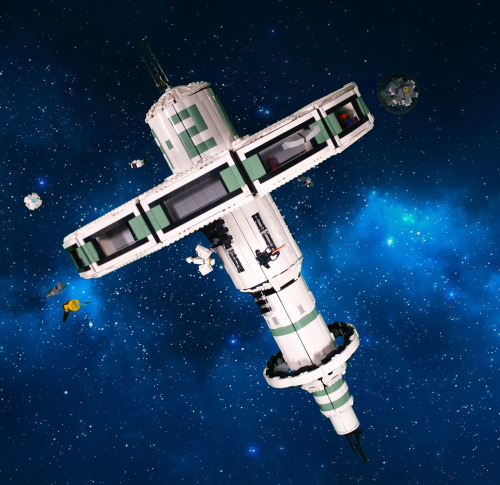
Finally...More than 60 hours of work, I can present my masterpiece. I have been working and planning this project for a long time. Given the sheer amount of things to talk about, I will split all of my rambling in (at least) four posts : one about the concepts, ideas, and general aspect (you're here !); one about the technical side of things; one depicting how the project evolved (using pictures taken during the construction); and one dealing with all the smaller details, ships, and such.
Enough with planning, though. Explanations, other images and more explanations below the cut !
(less) edited picture of the build :

So. You might see, now that I got rid of all that pesky editing (or most of it) that there is a big arm holding the thing in place. It's easily a fifth of all the work of this build, because I absolutely wanted to hold this thing at an angle, and it's heavy, at around 15 kilograms (33 pounds). I'll talk about the technical difficulties of that in a later post, but it was important for it to be solid, because the station was the central piece of my second ever (very small) lego exhibition. AND it allowed me to meet the recruiter of a much larger exhibit. Long story short, in a month, I'm presenting this piece again (just before my exams, whoops-).
Anyway. Not only is it heavy, but it's also quite tall and wide. Around a meter at the highest point (tilted or not), while the diameter of the main ring is at around 0.75m. Quite a difficult thing to move around. Or is it ? Well, yes and no.

Here are all the main components (excluding the holding arm), when I move the piece around. Of course, all the ships are detachable (it allows me to move them around from one day to the other), but the dome carrying the antenna can also be removed, and then, the entire ring can be disconnected (that, too, was quite a challenge).
Removing the ring obviously makes it waaay easier to transport, because a single wooden plank can then be used (again, except for the arm, but that thing was made to be sturdy, so it can be transported with less care); and , once the dome is removed, I can just let the central cylinder stand upside-down (useful for storage). The only trouble I found with this system is that I once connected the ring the wrong way around, meaning everything in the small hangars was upside down. Quite an embarrassing moment.
Speaking of the hangars, I initially wanted to keep them all empty, to store ships inside, but it didn't really offer this piece the sparkle of life. Setting up these small decors inside most of them, with colors contrasting with the general theme of the build, was actually a really good addition.
The colour scheme as it is now is not exactly the one I had planned at the start of the project. I originally planned on using bright light orange (bricklink colour name) instead of sand green, but I found out that this colour was tough to find in large quantities, and I already had quite a bunch of the sand green, so this tragic decision was made. I think it would have offered a more vibrant colour to the build (resembling a Subnautica default palette, which I enjoy quite a lot), but in hindsight, the green works really well, appart from a small detail I'll expand on in a minute.
What's really funny for this project is that, when it started, I actually only wanted a nice way of showcasing all the little space ships that I tend to make whenever I have access to a small amount of cool pieces. Then came a long time where I only daydreamed about it and planned how I would want it to go, and only when I had a clear vision did I start the actual building process. So, taking all that into account, you can probably double the amount of time I spiritually spent on this project.
What I knew is that I wanted to get this huge ring held by beams to the station's body, which made the build both more interesting and more complicated that it would have been. But the challenge was appealing.
At first, the main body was completely flat and white, but I soon had to add texture, both because it was becoming ugly and because the 2*2 white curved slopes were starting to diminish fast. The first modifications I did were to add the sand green curved slopes instead to create stipes, then letters : the big A-2 you can easily spot. With the few bits of lore that I have created for this piece, you have to imagine that there are hundreds of these stations spread in the galaxy, which can be easily described through 3 criteria : the Letter, the Number, and the Colour. That would mean that, if you wanted to meet with someone at the exemplar I made, you would say something along the lines of 'Meet you at Sand Green A2'.
Texture-wise, the other element of the largest cylinder is the exposed bits of machinery, very classic in sci-fi, I know, but it does work well in this context. The second cylinder has much less textures, with only a few grates, and some 2*1 ingot pieces (because they look cool); but it also has its own, smaller ring (diameter slightly larger than the largest cylinder's).
Then come the smaller cylinders, which don't have much texture, except in their transition from one to another (barely visible in any of the pictures, but it exist).
Overall, I'm also really happy of how round it looks, given that circles are not my speciality.

Here is a completely unedited picture of the support arm (Lewa for scale), with a nice counterweight which might be necessary to hold the entire thing in place (it may not be, but I'm not trying to remove it. Bad idea.).
As you might notice, my studio is not a shelf anymore. I built something new from scratch with a green screen, because I thought it would make my editing job easier. And it would have, if I didn't use sand green in my build. Anyway, I'm keeping this for a few days, to snap some pictures of the MOCs which don't fit in my shelve (and are not green, meaning editing will be easier.
Here is the 'studio' from an outside point of view :

I know it's quite a mess outside of my clean perimeter, but I do as I can. You can see one light in the foreground, but there is also one (less visible in the background), symmetrical to the first one, and a third one behind and above the camera (outside of the picture).
You may also notice a lot of sorting boxes. Sorting pieces can greatly improve your productivity, if you label all your box correctly. Covered by the greenscreen is essentially a shelf full of these sorting boxes, labelled by colour and piece type, and it was really practical. Anyway. Thank you for reading until this point, I guess ? If you survived through all this rambling, you probably deserve something...
I mean- Have these pictures I took during the exhibition, I guess...


(You can notice that these are two different days because of the ships’ placement).

✨Clone wars diorama !✨
Another one, technically the largest I have posted (yet~), featuring the 212th and a (placeholder) Jedi.
Of course, closeups and additional details below !
Views from directly in front/above :


Before I continue, I must confess it. This horrendous mistake, which you might spot by paying close attention to the right part of the image.
Yes. I somehow created an offset on the entirety of the wall’s height.
Overall, I’m quite happy with this one, mostly the environment, which turned out great (except for the offset….). What I’m not really sure leases with are the cheap AT-RTs from the battle packs, which are too bulky, but it works well enough for the moment, and since I’m not exposing to any connoisseur, it does the job.
Most of the minifigs are from these battle packs too, except for the Jedi, which is actually a savage oppress with a cloak, but every time I try to just remove the minifig, it feels like something is missing. The paratrooper captain has the hold grey kama and pauldron which always work well, even if it could have done with an additional visor.
Anyway, let’s get going with the closeups !
AT-RT scenes :


On the left, an engineer (my favorite kind of clone) fixing a broken down leg, with the help of one of the pilots. It was hard to get the minfigs in a 'lively' position, and the photo doesn’t render it correctly. The small white backpack is a piece I’ve stolen from the 501st specialist pack, because it’s nice.
On the right, a paratrooper with a completely inaccurate rocket launcher (the clone wars’ ones don’t look as cool, though). I quite like the way this part came together, even if it’s just a small detail.
Explosion scene :


I’ll admit it’s my first try with building explosions, and I’ll hopefully improve.
On the right, the clone says hi ! Well. No. He doesn’t, but it’s what he looks like on the photo, which I funny, I’ll admit, but not the image I wanted to convey, even if technically he’s set properly, as a projectile caused by the explosion.
The picture on the right convey the feeling of movement much better, with the clone shooting on the left, the others running along, and the paras being blown.
Other scenes :


The focus on the left is the droid ! I really like how it’s sprawled over that rock. Other droids can be found in the diorama, notably one being crushed by the rocket launcher AT-RT, partially under a rock, and part of one in the explosion.
On the right, we see a paratrooper down (but still fighting !) with, at his side, a medic applying a hypo. While it’s hard to see with this picture, he has a pouch at his side, and some chroma-black legs, because I was missing a pair of legs the medic has prosthetic legs, isn’t that awesome and convenient ? That is a lesson to learn, any lack can become lore ! Well, kind of. It’s what I also did with the Kashyyk MOC : I was missing all but the helmet of my ninth minifig, so I turned it into a grave of the missing squad member.
A tangent about hexagons
Because the project I’m working on brought it, I found it interesting, and I thought some people might need it.
So, as I’m working on a quite large project (hopefully done by next week, although I have doubts on that), and the base structure of it is more or less hexagonal. Anyway, here are some of my tips to get good hexagonal shapes.
The easiest way to do this is obviously with hinges and plates, like that :

While not necessarily accurate, it’s cheap and efficient, albeit squishy, and can be expanded to any size.
Instead, we can go the technical way, and use maths, by considering that a hexagon is the combination of 6 equilateral triangles. We end up with this :

Practically unbreakable, very stable, and can be made with as much technical bricks as possible, so it is easily expandable, but it’s harder to attach it to classic bricks.
So, none of these two designs are really good alone, whether on pure usability, or on durability. Alone, that is. Now, here is the fun part : thanks to the way Lego works…


…they work together ! And, with some modified 2*2 plates, they mostly hold to one another ! Isn’t that awesome ? What’s more is that, while I’m using 2*4 plates and a 7 holes technic bars, that also works with 2*6 and 11 holes bars, which is good.
Now, let’s apply this knowledge to make a solid prism with an hexagonal base :

By using a bunch of plate and two of these hexagonal bases, we get a hollow tube, which is solid through the hexagons, but can still break because of a diagonal force. To fix that, we need to add supports between the supports, like so :
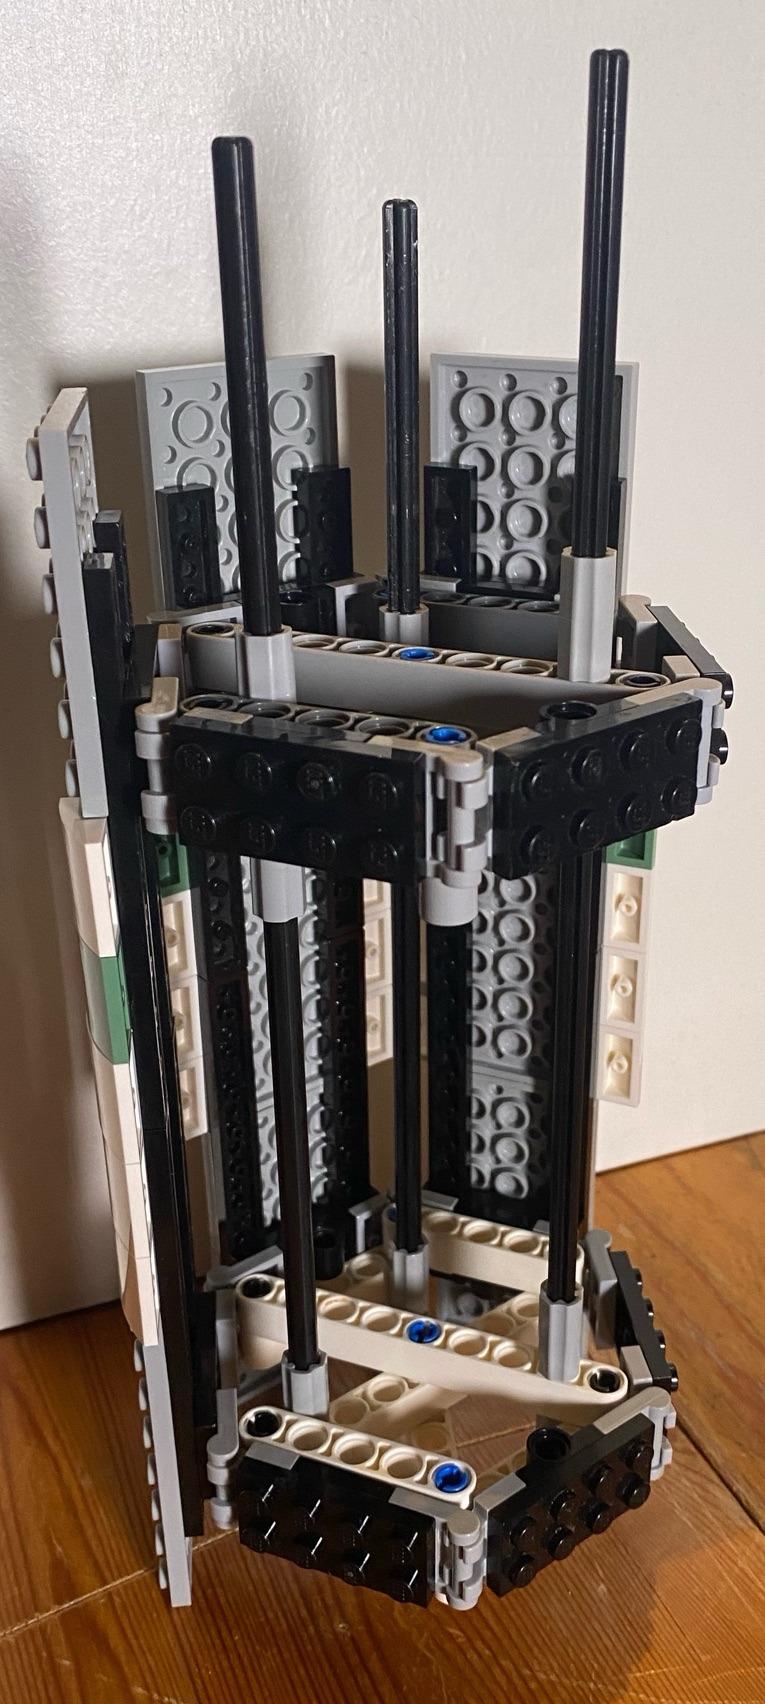
This also means that this design becomes stackable. Congrats, you made a long hexagon tube ! It can also be round, with the right modifications, notably with 2*2 curved tiles :

It fits perfectly, and it’s good to make solid near-circles !
Sorry for the photos’ quality !- They were taken quite late with my phone, and without proper lighting.


✨Small theatre !✨
A small but really fun build made for a relative’s birthday.
While there isn’t much to mention build-wise, a few details are interesting :


Firstly, I managed to get the effect of multiple curtains in a row by making 'banners' which are directly connected to the ground.
The base is partially empty, and behind the gold details are 1*4 black tiles on snots which give a pretty nice black aspect (although now that I think back on it, 1*4 bricks would have done the job.
Finally, the floor is a single, large door from a castle set ! I really like the way it’s shaped and likely will reuse that technic again someday.

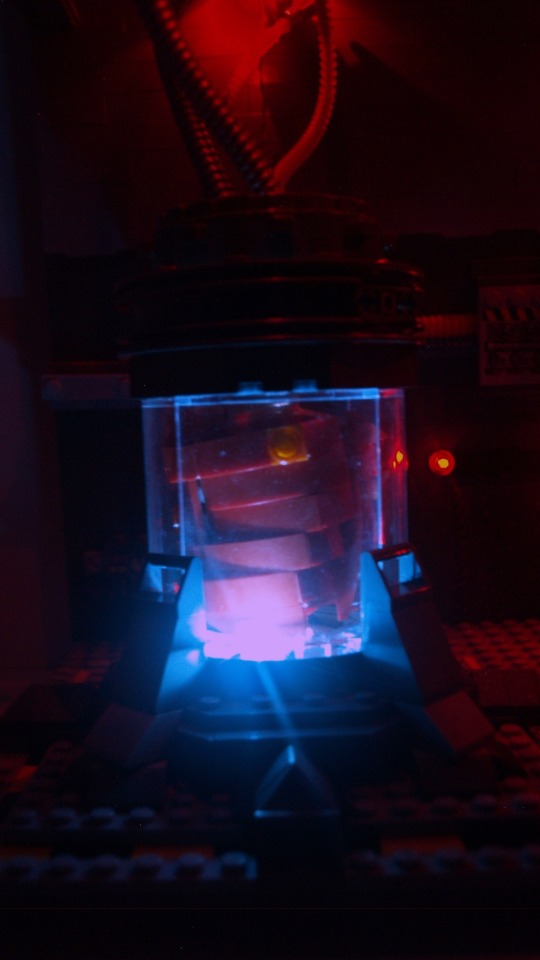
✨ Breach of containment ✨
This is the last I’ve been working on for the past few weeks, very, very inspired by the game Carrion (if you haven’t played it yet, you absolutely should !), which is made all the more special because I finally took time to use my lighting kit (seem below). Of course, closeups and commentaries below the cut

Left containment unit closeups :

Right containment unit closeups :


Top closeup :

Alt version (studio lights + in-built lights) :

This is one of the screenshots I’ve been working with (where the monster just breached containment) :

So, as I said previously, this piece is heavily inspired by Carrion. I tried to look up any previously made Lego thing related to the game, but all I could find were a few Reddit posts with (debatably) interesting takes on the monster. So, the good news is that this is most likely the most original piece I’ve made yet.
The original plan was to have only one container, and one monster, with left being the body inside and right being the outside part. However, placing Left in the middle of the transparent pieces made it mostly good on its own, so with some modifications, I made it work alone and expanded the outside part inward, and ended up with two of them.
Left is pretty okay from all angles, but Right is not necessarily as good from the back, and had a supplementary jaw on the side of the container which can’t be seen on the photos.
Getting back to comparing that to the game. I tried to stay close while adding my own little details. The wiring and cable system is from me, but the container is mostly inspired by the game, just like the electric box (middle) and the little informative display (under the electric box) which is…empty, yes.
Some details can’t be seen on the photos (or barely), which are mostly some filler sci-fi stuffs to make the wall less flat and less empty.
What also helped with breach the flatness of the wall is the switch from dark grey to light gray, using the awesome spring projectile launcher piece, which has this very nice shape which make the transition just a bit smoother.
So, let’s talk about whatever I’ve done with the lighting !
I’ve had this old lighting kit (originally designed for a car model) lying around for a long time, and finally got to use it ! It doesn’t look really good without my studio lights because my camera is not made for that (The effect in reality really gives escaping monstrosity a dark vibe which is not well depicted with my photos…). Another thing which is not noticeable with the photos is that the two red dots in the center are actually blinking lights (and somehow, they tend to desynchronise).
The choice of letting some of the wires out is debatable, but I think it adds to the vibe (and some of them would have been a pain to hide anyway). And sadly, the back is but a mess of wires, but I can’t actually do anything about that.
Speaking of the back, the whole thing is one dot large and completely flat, and the ceiling only hold without pillars because of the use of tension linking directly the baseplate and the roof through the use of technic bars; and probably because the ceiling itself is not that heavy. It is, in fact, only constitued of six old road pieces connected together and frames, which give the roof little weight and high sturdiness (and the shape on the side of the piece offers a nice sci-fi effect as a bonus).
The addition of tentacles in the vent (which hides the connection between road plates in the roof) is just another reminder of the game : you can’t be safe anywhere, if air flows~
-
 nasthesilly liked this · 4 months ago
 -
 care1238 liked this · 5 months ago
 -
 antrylis reblogged this · 5 months ago

They/them - AroaceLego MOCs and photography with a wide range of different characters and environments, every Wednesday (in theory-)
77 posts